
This first piece is a clamp resist vintage napkin. I knew that the rust uptake would be difficult because of the way I clamp (accordion fold to about 1 1/2 inch width, then double over, then put clamps at 1/4 inch intervals along the piece), so I sprayed the fabric with vinegar and sprinkled small bits of steel wool over the surface before I folded it. I poured strong tea over it after 24 hours and let it sit for four more hours.


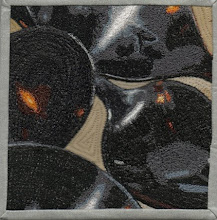
I found these rusty looking fetish bears at Marco's in Dayton on the sale table, so I thought I would see if they created a pattern. I'm not sure they were effective, but I think I'll try clamping them and seeing what sort of resist I get.

 These are both white on white polka dot fabrics. The photo shows both the front (on bottom) and the back of the fabrics. The one with the smaller dots was rusted with the new fluted cast iron muffin tin that I got from the quilter's garage sale last week. The larger dots were wrapped around the iron rake. I really like the patterns and I can't wait to put some Radiance on it. I put tea on these for four hours.


These last three are glue resists. I had some problems with this. First, on the two outside pieces (far left and far right) I applied the glue freehand and much heavier than the one in the middle with the circle stencils (you can tell by the circular circles as opposed to the ovoid messes that I draw when I'm working freehand). I pole wrapped the one on the left and wrapped it in Saran Wrap. The glued places stuck to each other in some areas, so I got some ripping. Not a bad thing, but I probably won't pole wrap anything glued again. The stenciled circles in the middle I put on the wire basket and then I covered it with steel wool and some other rusty objects to get more even rust. The final piece I folded in a rusty pan with rusty objects between each layer. If folded the fabric over so you can see the difference between the side with the glue (the Radiance side, the one on the bottom). I think I will glue on the cotton side next time, as I like the more subtle pattern on the reverse.
I put tea on these for four hours. My problem was with the ones that had the heavier glue application. Everything I read lead me to believe that the glue would come out easily. But I didn't find that to be the case. I washed and scrubbed the fabric with my hands and with a scrub pad in hot water three different times and it didn't come out. Then I ran it through the washer three times. I think it's finally mostly gone. Where there was glue in some places the fabric is stiffer. I did find the removal process frustrating. Soy wax or beeswax would probably have come out more easily though they would have required more set up. I like the resists, and I think I'll try to do some more clamped and then clamped again and overdyed.

What to try next? I'll go back to Ann Johnston's and other surface application books and see if I'm missing any other possibilities here. I think I'll try more of the shibori resists with steel wool captured between the layers to see if I can duplicate some results that others are getting. I'm also tempted to see how the iron sulfate works. Oh, I did dye a ribbed T-shirt, but I'll post it after I get someone to model it for me.


9 comments:
I'm so glad to have come across your blog, Lori! I'm not normally a rust dyeing person (meaning I haven't jumped into doing it myself yet), but I absolutely LOVE the way you are doing it! I especially like how you've used the rusty fabrics with the other soft-dyed colors in your weekly quilts - best I've seen, I think. And I think using tea as an additional "dye" with the rust fabrics is genius.
P.S. I see you're in Yellow Springs - my daughter went to Antioch, so I've spent time there - what a fun little place!
Cathy, Thank you so much. Yeah, Yellow Springs is a wonderful place. I'm so happy to be here. Thanks for the Kudos.
Great experiments and wonderful results. The bears transferred well and I really love the resist ones.
Lot's of 'food for thought'
Thanks Rhoda, I didn't think the bears had transferred well at first, but you can definitely see them. I just worry that if people don't know what fetish bears look like they'll just see a blob. Great results on your first experiments, too.
You got some wonderful results. Thanks for sharing them all.
Thanks, Norma. I've done two more batches since I posted this, but I'm going to overdye some of them before and maybe even get them into a quilt before I post them.
These are amazing. Thanks for sharing your samples. And thanks for commenting on my fish quilts. I am glad to have found your blog.
Thanks, Lisa. I'm finishing up some small quilts I made with the fabric today, so I hope to have them posted tomorrow.
just fascinating, ive been rust dyeing for a while now and never seen this before, thanks so much for sharing xx
Post a Comment